

The Name Directory module serves as the primary KYC / AML Compliance Database for Whitelisted Counterparties. Its core purpose is to map anonymous blockchain wallet addresses to real-world, verified legal identities to comply with international regulations.
Once a name entry is approved, enterprises can easily select the whitelisted counterparty for any future transaction, eliminating the need to repeatedly re-enter identity details. This guide provides step-by-step instructions on how to navigate the Name Directory dashboard and manage entries.
🔒 Policy Note: To maintain top-tier institutional security, creating or modifying a whitelisted address group follows a dual-authorization workflow. A new setup requires an initial configuration submission by an authorized administrator followed by mandatory final approval from the enterprise's Root user.
Role | Access |
|---|---|
Root Admin | ✅ View & Approve changes |
Super Admin (all) | ✅ View, Add & Archive (Root approval required) |
User (all) | ❌ No access |
Dashboard Navigation & Management
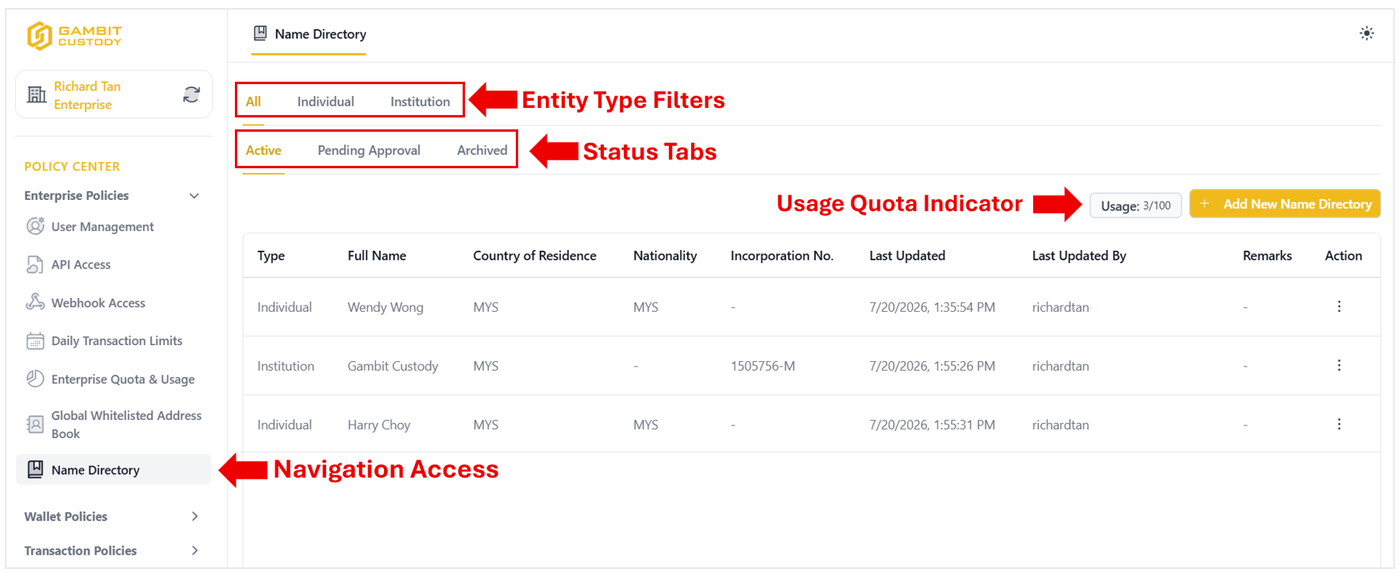
The Name Directory interface provides dynamic filtering options and quota tracking to help you organize and monitor your counterparty entries efficiently:
1. Navigation Access
Sidebar Menu: Access the module at any time by navigating to Policy Center > Name Directory on the left-hand side menu.
2. Entity Type Filters
Filter your counterparty list by classification using the top tab bar:
All: Displays all directory entries regardless of entity type.
Individual: Filters the list to display personal individual profiles only.
Institution: Filters the list to display corporate or organizational entities only.
3. Status Tabs
Track the approval lifecycle and status of your counterparty records:
Active: Displays all fully approved counterparties available for immediate selection during live transactions.
Pending Approval: Displays newly created entries currently awaiting review by a Root Admin.
Archived: Holds deactivated or historical entries that are no longer active for transaction selection.
4. Usage Quota Indicator
Usage Counter (e.g., 3/100) : Located at the top-right of the directory table, this tracks your enterprise's active entry count relative to your total allocated directory quota.
How to Create a New Name Directory Entry
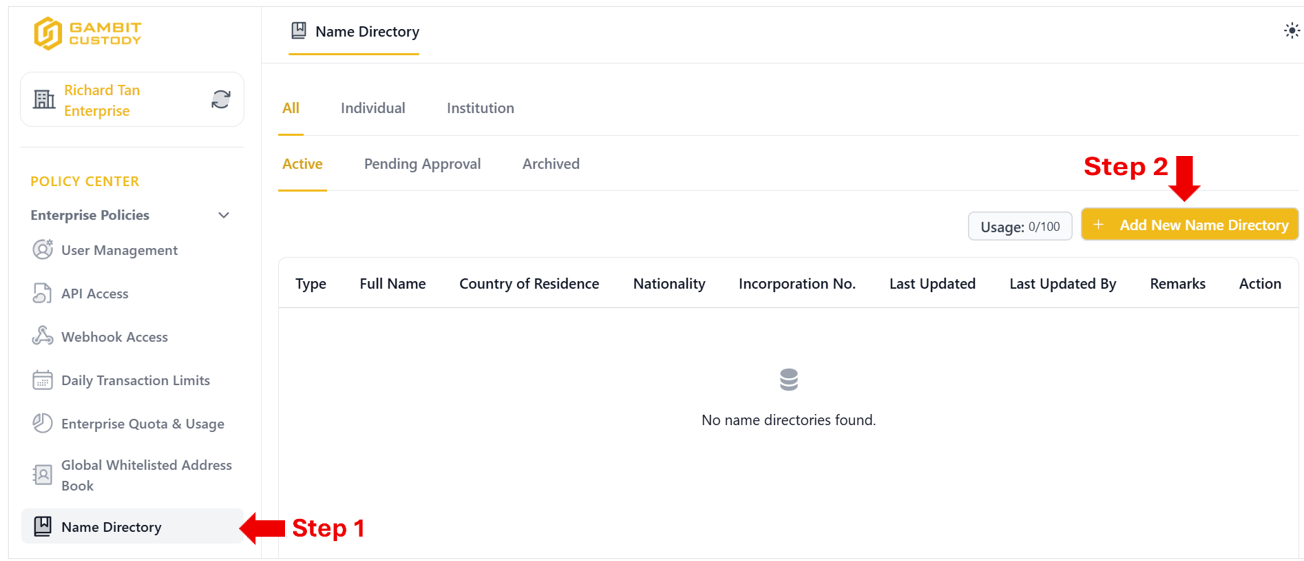
Step 1: Navigate to the Name Directory
From the left-hand navigation sidebar, select Name Directory under the POLICY CENTER menu.
Click the + Add New Name Directory button located in the top-right corner of the screen.
Step 2: Enter Name Directory Details
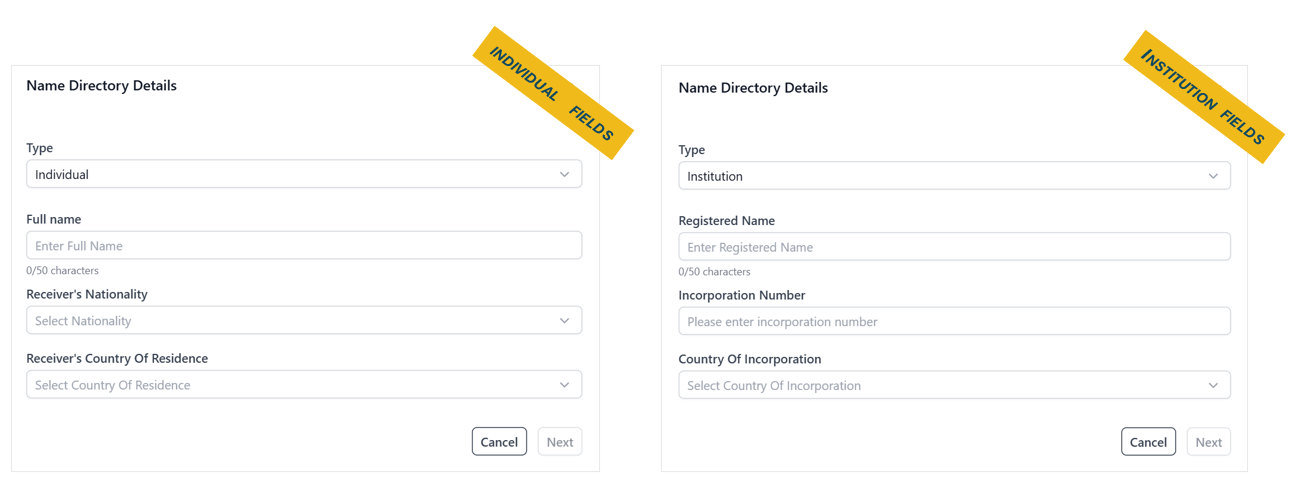
A modal window will pop up based on the selected Type (Individual or Institution).
Fill in the required fields:
Individual: Full Name, Receiver's Nationality, and Receiver's Country Of Residence.
Institution: Registered Name, Incorporation Number, and Country Of Incorporation.
Click Next and complete the required multi-factor authentication (MFA) to submit the request.
Step 3: Review and Approval by Root Admin
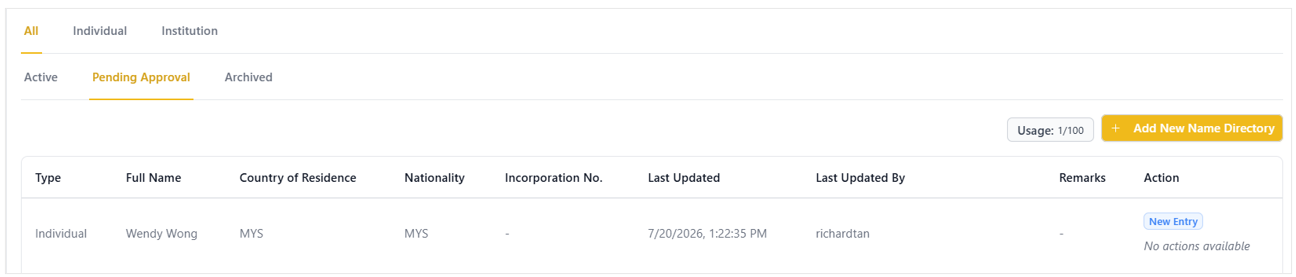
Submitted requests are initially held under the Pending Approval tab for Root Admin review.
Once approved, the entry will automatically move to the Active tab.
Ready for Use: Enterprise users can now select this approved counterparty directly during future transactions for a seamless checkout/transfer process.
Key Benefits
Compliance: Easily link wallet addresses to verified real-world entities for KYC/AML audits.
Efficiency: Reusable counterparty profiles save time and prevent manual entry errors during recurring transactions.